Sale-A-Bration’s Beautifully Happy Stamp Set is one of the products you can choose free with qualifying order. For every $50 US and $100 US you spend (before tax and shipping), you’ll earn an exclusive Sale-A-Bration item for free! There are a stunning variety of stamp sets and Designer Series Paper for you to choose from—take a look! Now through 28 February.


Create beautiful floral projects using the Beautifully Happy Stamp Set. This all-occasion stamp set features floral designs as well as greetings that can be used on their own or paired together for more versatility all year long! Combine the stamp pieces of the hollyhocks for a Two-step effect or create a soft and subtle individual colored floral background using your favorite coloring tools. Send happy thoughts, share friendly notes, or wish happy birthday through your own floral style!

Each Sunday I create a card using one of my card sketches and share it with you. You can create a card exactly using the sketch layout or change it up a bit. You could substitute a circle for a rectangle or turn the card from portrait to landscape giving it an entirely different look. Let your imagination run wild!
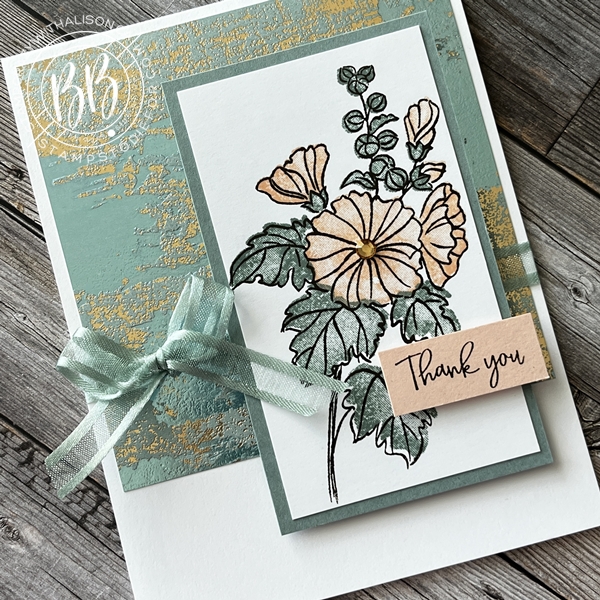
The beautiful background paper is from the Dry Brushed Metallic 12″ x 12″ Specialty Designer Series Paper. I choose Petal Pink and Soft Succulent for my color Pallete.
Beautifully Happy Card Directions
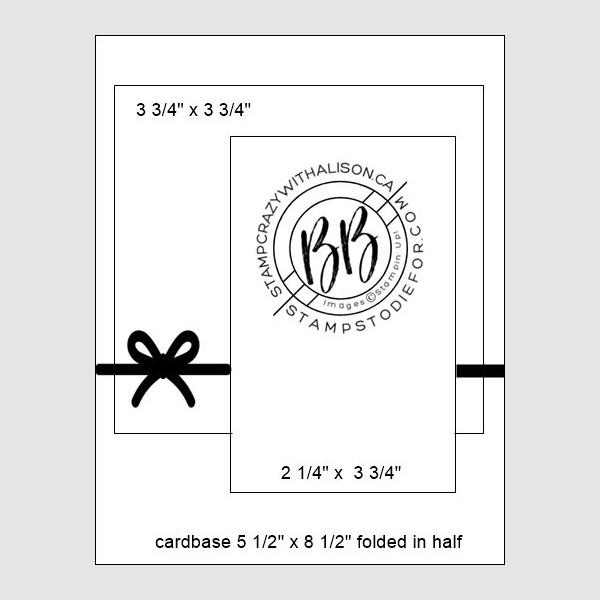
paper measurements
- Basic White Thick (cardbase): 4 ¼” x 11” scored at 5 ½”
- (flowers): 2 ¼” x 4”
- Soft Succulent (mat): 2 ½” x 4 ¼”
- Petal Pink (words): 5/8” x 1 ½”
- Dry Brushed Metallic Designer Series Paper: 4” x 4”
card directions
- Score the Basic White Cardstock at 5 ½” and fold in half to create card base.
- Glue the Designer Series Paper to the top portion of the card front about 1/8” from the edges.
- Tie the ribbon around the cardfront about 2 ½” from the bottom edge with the bow to the left-hand side of the card.
- Stamp the flowers in Tuxedo Black Ink on the Basic White Thick Cardstock.
- Stamp the leaves in Soft Succulent Ink and the flowers in Petal Pink Ink.
- Adhere the Basic White to the Soft Succulent Matt.
- Adhere the mat to the cardfront with Stampin’ Dimensionals.
- Add one of the large Champagne Rhinestones to the large flower center.
- Stamp “Thank You” on the Petal Pink Cardstock strip.
- Adhere the strip to the lower right-hand side of the flower with Stampin’ Dimensionals overhanging the mat a bit.
- Stamp a greeting inside the card in Tuxedo Black Ink.
I hope you found some inspiration here today.
Want More?
Alison is great at doing a Facebook Lives on our Facebook Group!
Hop over to our Border Buddy Hangout Facebook Group and check it out.
Not a member? Ask to join!
Would Love to have you shop with us!
• Patsy’s Online Store (US customers)
• Alison’s Online Store (Canadian customers)
Thanks for visiting my blog today! Happy Stamping!
Current Host Code 69TADYNY


This is also a beautiful card!!!! Thank you so much!!! And I also made this card this afternoon.
CONGRATULALTIONS !