Cup of Tea Bundle was top on my list when the Annual Catalog came out last spring. My mother collected tea cups and they bring back so many wonderful memories. I was gifted with two amazing parents who died to young but they live on in me, our children and grandchildren. I often see little traits of my mom or dad in them.

When you buy the Cup of Tea Stamp Set and coordinating Teacup Dies in a bundle you save 10% on both. Also to go with this fun set is the matching Tea Boutique 6″ x 6″ designer series paper. The paper has tea-themed images—teacups, teapots, lemons, herbs—on one side with all-purpose patterns on the other side. Sometimes it is so hard to choose which side to use.

Nothing gets my stamping mojo going like a card sketch. Today I used the exact layout of the sketch. Sometimes I turn it from portrait to landscape or replace the circle with a square. There is no right or wrong, just let your imagination run wild.

Sometimes I find the 1/8″ ribbons too narrow for some projects like this one. So I cut a piece of paper to create paper ribbon. Don’t you just love how the tea cup has the filigree design on top.
Cup of Tea bundle Card Directions
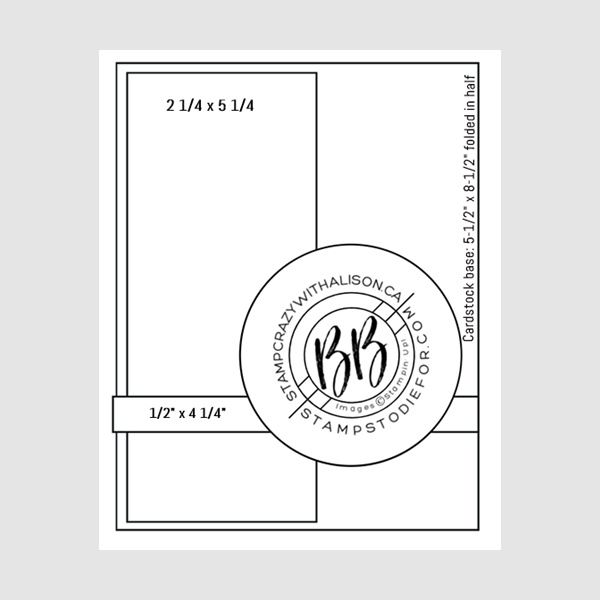
paper measurements
- Basic White (top fold cardbase): 4 1/4″ x 11″ scored at 5 1/2″
- (circle): 2 1/2″ x 2 1/2″
- (tag): scrap
- Tahitian Tide (cup): 2 1/2″ x 2 1/2″
- (cup filigree): 2 1/2″ x 2 1/2″
- Tea Boutique Designer Series Paper (teapots): 2 1/4″ x 5 1/4″
- (plaid): 2″ x 5 1/4″
- (paper ribbon): 1/2″ x 4″
card directions
- Fold the Basic White paper on the score mark to create card base.
- Glue the plaid designer paper to the right-hand side of the card front about 1/8″ from the edges.
- Adhere the tea pot paper to the left-hand side of the card about 1/8″ from the edges overlapping the plaid a bit.
- Glue the ribbon strip to the card front about 1 1/2″ from the bottom.
- Tie the 1/8″ Starry Sky Metallic Woven Ribbon around the paper ribbon strip with the bow to the left side of the card.
- Cut out the circle using the Stampin’ Cut & Emboss Machine and the Stylish Shapes Dies.
- Adhere the circle to the cardfront over the ribbon using Stampin’ Dimensionals.
- Die cut the tea cup and the filigree using the Teacup Dies.
- Glue the filigree to the die cut tea cup.
- Stamp the words in Starry Sky Classic Ink and die cut the little tag.
- Adhere a piece of Basic White Baker’s Twine to the back of the tag with a Stampin’ Dimensional and the other end of the twine to the back of the tea cup.
- With Stampin’ Dimensionals place the tea cup to the center of the circle.
- Stamp a greeting inside if you wish.
I hope you found some inspiration here today.
Want More?
Alison is great at doing a Facebook Lives on our Facebook Group!
Hop over to our Border Buddy Hangout Facebook Group and check it out.
Not a member? Ask to join!
Would Love to have you shop with us!
• Patsy’s Online Store (US customers)
• Alison’s Online Store (Canadian customers)

Leave a Reply