Get the Let’s Set Sail Bundle and set a course for your next crafting adventure! Featuring the Let’s Set Sail Stamp Set and the Sailboat Punch, this bundle makes crafting a breeze.
This bundle is not limited to sailing-based projects. The sentiments in the stamp set open up lots of possibilities! I created this card for a graduation. Make a card for someone who’s embarking on a new adventure. Add a Father’s Day sentiment from another set to create a Father’s Day card your guy will love.

Each Sunday I create a card using one of my card sketches and share it with you. You can create a card exactly using the sketch layout or change it up a bit. Replace a circle with a square or even turn the card from portrait to landscape. Let your imagination run wild!
Let’s Set Sail Bundle Card

Simple Stamping Steps & Measurements
PAPER
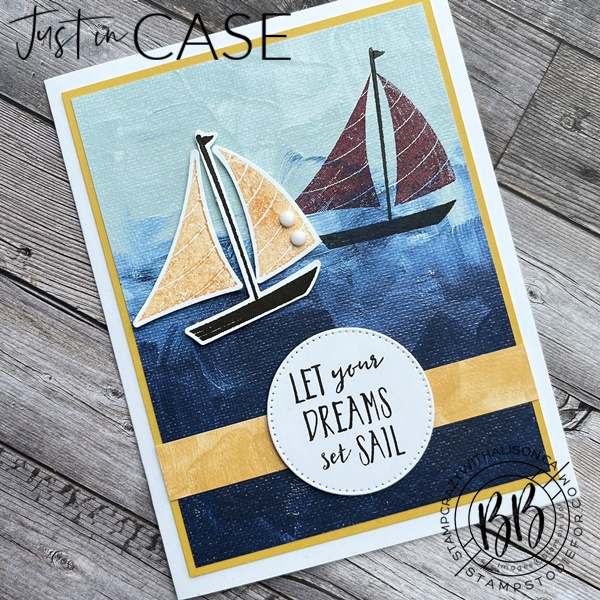
- Basic White (card base): 5 1/2″ x 8 1/2″ (scored at 4 1/4″)
- (circle):
- (sailboat):
- Crushed Curry (mat): 3 5/8″ x 5 1/8″
- Hues of Happiness Designer Series Paper (sea): 3 1/2″ x 5″
- (strip): 5/8″ x 3 5/8″
DIRECTIONS
- Fold the Basic White cardstock on the score mark to create your card base.
- Stamp the sailboat in Early Espresso Ink on the designer series paper in the upper right-hand corner.
- Use Cherry Cobbler Ink for the sails.
- Glue the strip to the designer series paper about 3/4″ from the bottom.
- Stamp the words in Early Espresso Ink on Basic White and die cut using the Stylish Shapes Dies and the Stampin’ Cut & Emboss Machine.
- Adhere to the center of the strip with Stampin’ Dimensionals.
- Glue the designer series paper to the Crushed Curry mat and glue the mat to the card front.
- Stamp the sail boat in Early Espresso Ink and sails in Crushed Curry and punch out with the Build A Sailboat Punch.
- With Stampin’ Dimensionals attach the sailboat and sails to the left of the stamped one.
- Add two Classic Matte Dots to the front Crushed Curry sail.
For a quick tip how to stamp and punch the sailboat all at once visit my previous post click here.
product used for today’s card
")
")


 Designer Series Paper")


Leave a Reply