Christmas Season CASE card will inspire you and get your stamping mojo going! Do you ever sit at your stamping desk and wonder where to start?

Christmas season cASE card
Why not CASE a card? CASE stands for Copy and Selective Edit. When you CASE, you can copy it exactly, or selectively edit it by changing the colors or the stamp set or both. Today is a close case with simply changing the stamp set. The colors, embossing folder and layout are the same.
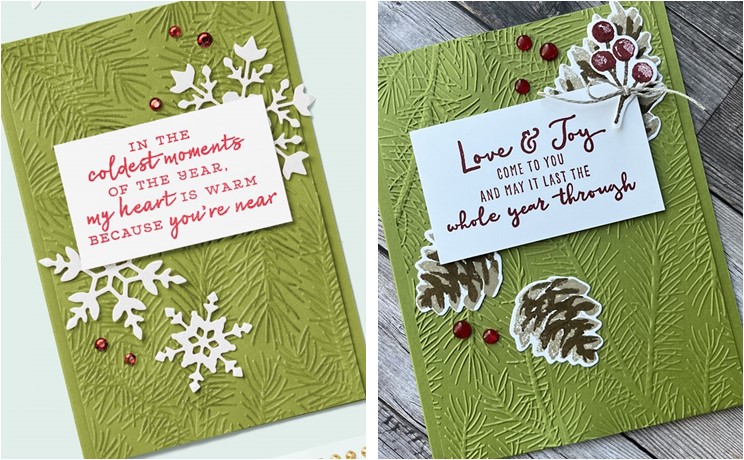
The card on the left is the card featured in the Annual Catalog on page 90. You can also find this sample at my Stampin’ Up! online store, along with a few others stamped with the Snowflake Wishes stamp set. The embossing was created using the Wintry 3D embossing folder and the Stampin’ Cut & Emboss Machine. The Stampin’ Up! sample is embellished with the Holiday Rhinestone Basic Jewels. For my card I colored the Opal Rounds embellishments with the Cherry Cobbler Dark Stampin’ Blend.
Christmas season cASE card Simple Stamping Steps and Measurements
Creating hand stamped cards doesn’t have to be difficult. Here are some simple stamping steps and measurements to show you how easy it can be.
paper Measurements
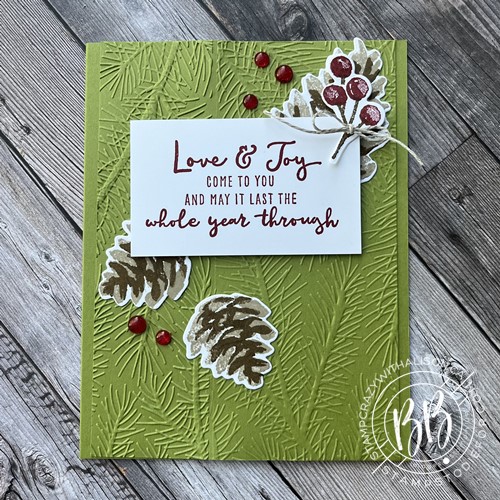
- Old Olive (base): 5 1/2″ x 8 1/2″ scored at 4 1/4″
- Old Olive (embossed): 4″ x 5 1/2″
- Basic White (words): 1 3/4″ x 3″
- Basic White (stamped images): 3″ x 5 1/2″
stamping directions
- Fold the Old Olive Cardstock base in half on the score mark to create card base.
- With the Wintery 3D Embossing Folder and the Stampin’ Cut & Emboss Machine emboss the Old Olive cardstock.
- Adhere the embossed paper to the cardfront with Stampin’ Seal.
- Stamp one large pinecone and 2 small ones with Crumb Cake and Early Espresso Classic Ink.
- Cut out the pinecones with the coordinating dies from the Seasonal Label Dies.
- Stamp the berry stem in Early Espresso Classic Ink and the Berries in Cherry Cobbler Classic Ink and cut out with the coordinating die.
- Adhere the pinecones as shown to the cardfront.
- Stamp the words from the Christmas To Remember stamp set in Cherry Cobbler Classic Ink on the Basic White cardstock and adhere to the cardfront with Stampin’ Dimensionals.
- Color the Opal Rounds Embellishments with the Cherry Cobbler Stampin’ Blend Dark and add to the cardfront randomly.
- Add the berry stem to the upper right-hand corner of the words with a Mini Glue Dot.
- Tie a piece of Linen Thread in a bow and adhere to the stem with a mini glue dot.
TIP: When using Mini Glue Dots for really small items simply roll between your fingers to create a very small ball.

Thank you for the “simple stamping steps and measurements”. That makes it easier to CASE a card. Love your pine cones. Thank you for sharing your inspiration with us.